Clock Operations (4.0.290 to 4.0.317)
Communicating with the Clocking Terminal
The ClockRite Clock Utility is used to communicate with your Clocking Terminal. You can use the Utility to download clocking data, and send new or updated Employee profiles to the Terminal
These instructions cover software versions 4.0.290 to 4.0.317. If you are using software version 4.0.334 or above, please click here
In this article
Communicating with the Clocking Terminal via LAN
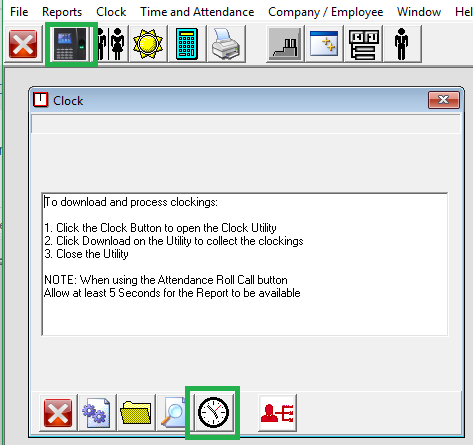
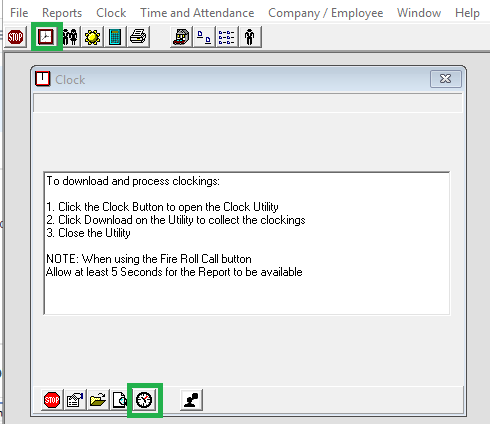
Select the 'Clock' icon in the top toolbar, followed by the 'Clock Operations' icon on the lower toolbar to open the Clock Utility and communicate with the Clock.
Downloading Data via LAN
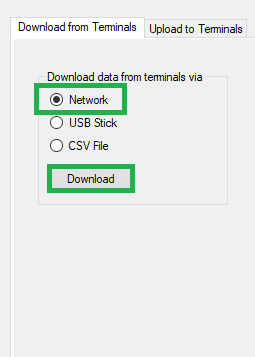
Select the 'Download from Terminals' tab to view download options.

To download data from, your chosen Terminals via LAN, ensure the 'Network' Download option is selected and click on the Download Button.
Data will be downloaded and displayed within the utility. ClockRite will then clear all data from the Clocking Terminal(s) in order to prevent any alterations or amendments being overwritten by the next download.
Close the Clock Utility, and ClockRite will process the downloaded data. This is normally done in a matter of seconds, but may take longer if there is a lot of data to process.
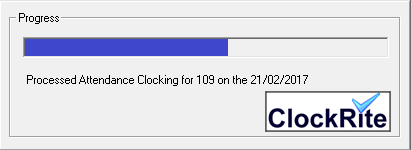
Please be patient as this process must not be interrupted. Occasionally the progress bar may show a 'Not Responding' Message. If you see this, don't panic, the utility always sorts itself out in the end.
Downloaded Data is displayed in the Time & Attendance Screen
Uploading Data via LAN
The Clock Utility can also be used to send Employee profiles to the Clocking Terminal and clear information if necessary. Select the 'Clock' icon in the top toolbar, followed by the 'Clock Operations' icon on the lower toolbar to open the Clock Utility and communicate with the Clock.
Select the 'Upload to Terminals' tab to view upload options.

The records to send to the Terminal can be filtered using the 'Companies', 'Groups', and 'Employees' options.
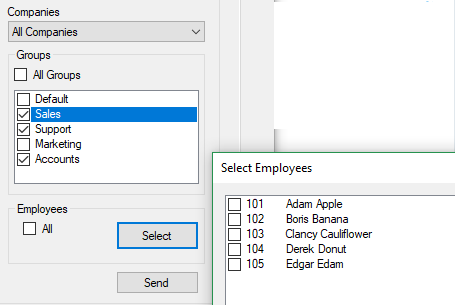
To upload data via LAN, ensure the 'Network' option is selected and click on the Send Button.
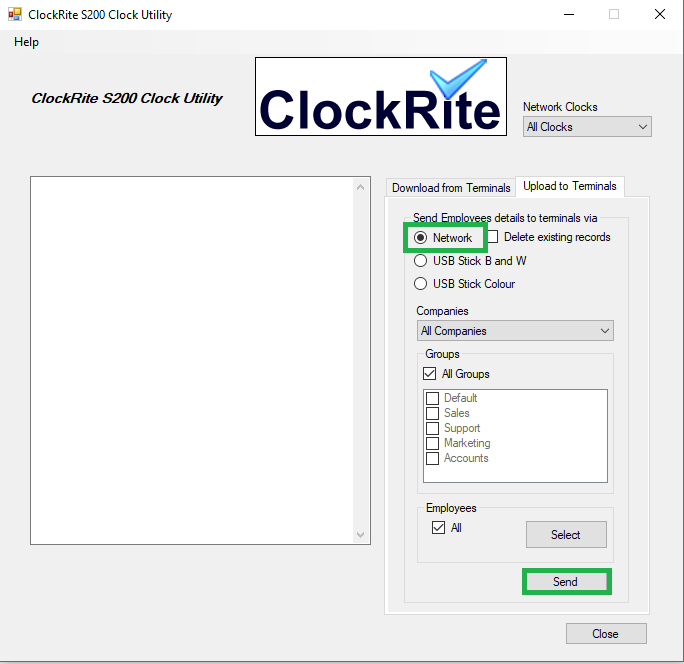
Using the 'Delete existing records' option will delete all data from the Terminal before uploading new records. Use this feature with care.
Back to the Top
Communicating with the Clocking Terminal via USB
If you are unable to connect your Clocking Terminal to your Local Area Network, downloads and uploads of data can be performed via USB Drive
Downloading Data via USB
At the Clocking Terminal
You'll need your Admin Card and USB Drive.
| Colour Systems (C200, C250, C400) |
Black & White Systems (C100, C240) |
- Insert the USB Drive into the port on the exterior of the Clocking Terminal
- Press the Menu or M/OK button
- Present the Admin Card to enter the Admin Menus
- Navigate to the 'USB' or 'Pendrive' icon and press OK or M/OK
- Highlight the 'Download' option and press OK or M/OK
- Highlight the 'Download Attlog' option and press OK or M/OK
- Data will be downloaded onto the USB Drive and the display will read Download Complete! or similar. Press OK or M/OK to confirm and the ESC key to return to the main Admin Menu. Remove the USB Drive from the Terminal
IMPORTANT: Once data has been downloaded onto the USB drive it must be deleted from the Terminal following the steps below. Do this immediately after downloading data and before any new clockings are made.
- In the main Admin Menu, select the 'System' icon
- Select the 'Data Mng' option
- Select 'Delete Attlog' and confirm if prompted
- Use the ESC key to exit the Admin Menus.
|
- Insert the USB Drive into the port on the exterior of the Clocking Terminal using the supplied extension cable
- Press the Menu button and present the Admin Card to access the Admin Menus
- Navigate the Admin Menu using the arrow keys to find the 'PENDRIVEMNG' option
- Select 'DWNLOAD ATTLOG'
- Data will be downloaded onto the USB Drive and the display will read Copy Data Suc[cessful]. Press OK to confirm and remove the USB Drive from the terminal
IMPORTANT: Once data has been downloaded onto the USB drive it must be deleted from the Terminal following the steps below. Do this immediately after downloading data and before any new clockings are made.
- In the main Admin Menu, select the 'OPTIONS' option, followed by 'SYSTEM OPTIONS'
- Scroll down to 'ADV OPTIONS'
- Select 'DEL ATTLOGS' and press OK again to confirm
|
|
At your PC
|
|
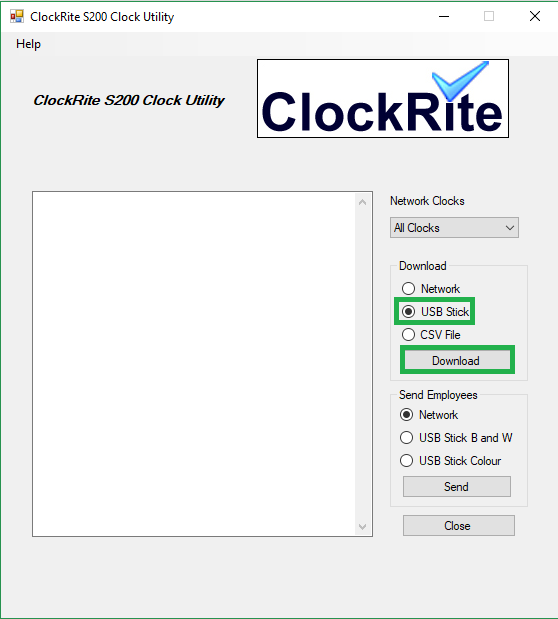
Once Clocking data has been downloaded from the Terminal onto your USB drive it can be transferred to the ClockRite Software. Open the Clock Utility by selecting the 'Clock' icon in the top toolbar, followed by the 'Clock Operations' icon on the lower toolbar
Check the 'USB Stick' box and click the Download button.
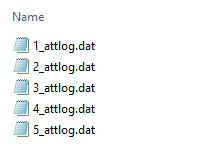
This will open a file browser. Navigate to your USB Drive and look for a file named 1_attlog.dat. Click on this file and select 'Open' to load the data.

If you have more than one Terminal, multiple # _attlog.dat files will be present, numbered in reference to the Terminal from which they were downloaded. In this case, load each file in turn.
The Utility will populate with data. Close the Utility and this data will be processed.
Please be patient as this process must not be interrupted. Occasionally the progress bar may show a 'Not Responding' Message. If you see this, don't panic, the utility always sorts itself out in the end.
Downloaded Data is displayed in the Time & Attendance Screen
Uploading Data via USB
At your PC
Please ensure you follow the instructions for your specific model of Clocking Terminal. Colour Systems have a colour display, while Black and White Systems have a black & white display.
| Colour Systems (C200, C250, C400) |
Black & White Systems (C100, C240) |
- Insert a USB Stick into your PC.
- Open the ClockRite Software and click on the Clock Icon on the top toolbar.
- A new window will open. Click on the Clock Icon on the bottom toolbar to open the Clock Utility.
- Under the 'Upload to Terminals' tab, select 'USB Stick Colour'.
- Specify which records to send by Company, Group, or individual Employees as needed.
- Click the 'Send' button. Ensure the popup window specifies that 'Colour' data is being created. If it does, click 'Yes.' If the popup window specifies 'BLACK & WHITE', click 'No' and go back to Step 5.
- In the 'Save As' window, select your USB Stick from the options on the left hand side and click 'Save.' You will then see a message confirming that Employee Names have been sent to the USB Stick. Please don't save Employee Names into a folder on the USB Stick as the Clocking Terminal will not be able to find them.
Before you go to the Clocking Terminal, please ensure that any files named template.fp10 or ssrface.dat (for facial systems) are deleted from your USB stick. Failure to do so may result in fingerprint registration errors.

|
- Insert a USB Stick into your PC.
- Open the ClockRite Software and click on the Clock Icon on the top toolbar.
- A new window will open. Click on the Clock Icon on the bottom toolbar to open the Clock Utility.
- Under the 'Upload to Terminals' tab, select 'USB Stick B and W'.
- Specify which records to send by Company, Group, or individual Employees as needed.
- Click the 'Send' button. Ensure the popup window specifies that 'BACK & WHITE' data is being created. If it does, click 'Yes.' If the popup window specifies 'Colour', click 'No' and go back to Step 5.
- In the 'Save As' window, select your USB Stick from the options on the left hand side and click 'Save.' You will then see a message confirming that Employee Details have been sent to the USB Stick. Please don't save Employee Names into a folder on the USB Drive as the Clocking Terminal will not be able to find them.
On Black & White Clocking Terminals the USB Upload function only uploads the employee ID (101, 102 etc). In order to upload Employee Names, the clock must be connected to your Local Area Network.
|
|
|
At the Clocking Terminal
You'll need your Admin Card and USB Drive.
| Colour Systems (C200, C250, C400) |
Black & White Systems (C100, C240) |
- Insert the USB Stick into the port on the left hand side of the Clocking Terminal
- Press the M/ key and swipe the Admin Card to access the Admin Menus.
- Use the arrow keys to navigate to USB Stick Icon and press OK.
- Navigate to 'Upload' option and press OK
- Highlight 'User Data' and press OK
- If successful the display will read 'Upload Complete!'. Press OK to confirm and then use the ESC key to return to the main menu.
|
- Use the USB connector cable supplied with your System to connect your USB Stick to the Clocking Terminal.
- Press Menu and swipe the Admin Card to access the Admin Menus.
- Use the arrow keys to navigate to 'PENDRIVEMNG'. Press F4/OK
- Select 'Upload User.'
- Once the data has uploaded you will see the message Copy Data Suc[cessful].
|
|
|
Back to the Top


