Getting Started - 5 - Uploading Employees
Step 5: Sending Employee Profiles to the Clocking Terminal
In this Article
Uploading Data via LAN
Click here for a short video illustration of the steps below.
1
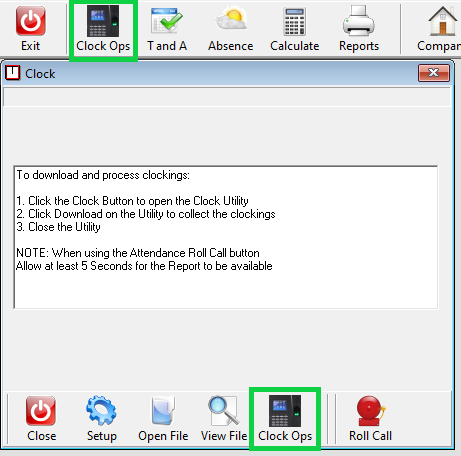
Open the ClockRite Software and click on the Clock Icon on the top toolbar, followed by the Clock Operations Icon on the lower toolbar to open the Clock Utility.
2
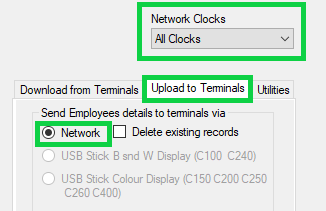
To upload employee profiles via LAN, select the 'Upload to Terminals' tab and ensure the 'Network' option is selected. Data can be sent to all Clocking Terminals simultaneously, or to individual Terminals as required using the 'Networked Clocks' drop-down.
3
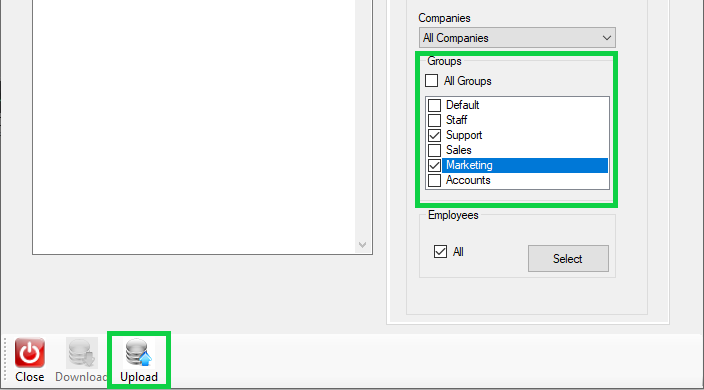
Filter the records to upload by Company, Group, and individual Employees as needed, and press upload.
4
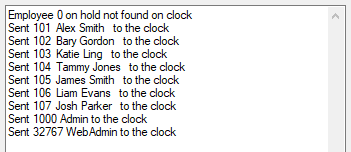
If the upload was successful you should see a list of all the names sent to the clock on the left of the download utility. Once Employee data has been uploaded, click 'Close' to exit the Clock Utility
Back to the Top
Uploading Data via USB
At your PC:
Please ensure you follow the instructions for your specific model of Clocking Terminal. Colour Systems have a colour display, while Black and White Systems have a black & white display.
| Colour Systems (C200, C250, C400) |
Black & White Systems (C100, C240) |
- Insert a USB Stick into your PC.
- Open the ClockRite Software and click on the Clock Icon on the top toolbar.
- A new window will open. Click on the Clock Icon on the bottom toolbar to open the Clock Utility.
- Under the 'Upload to Terminals' tab, select 'USB Stick Colour'.
- Specify which records to send by Company, Group, or individual Employees as needed.
- Click the 'Send' button. Ensure the popup window specifies that 'Colour' data is being created. If it does, click 'Yes.' If the popup window specifies 'BLACK & WHITE', click 'No' and go back to Step 5.
- In the 'Save As' window, select your USB Stick from the options on the left hand side and click 'Save.' You will then see a message confirming that Employee Names have been sent to the USB Stick. Please don't save Employee Names into a folder on the USB Stick as the Clocking Terminal will not be able to find them.
Before you go to the Clocking Terminal, please ensure that any files named template.fp10 or template.fp.10.1 are deleted from your USB stick. Failure to do so may result in fingerprint registration errors.
|
- Insert a USB Stick into your PC.
- Open the ClockRite Software and click on the Clock Icon on the top toolbar.
- A new window will open. Click on the Clock Icon on the bottom toolbar to open the Clock Utility.
- Under the 'Upload to Terminals' tab, select 'USB Stick B and W'.
- Specify which records to send by Company, Group, or individual Employees as needed.
- Click the 'Send' button. Ensure the popup window specifies that 'BACK & WHITE' data is being created. If it does, click 'Yes.' If the popup window specifies 'Colour', click 'No' and go back to Step 5.
- In the 'Save As' window, select your USB Stick from the options on the left hand side and click 'Save.' You will then see a message confirming that Employee Details have been sent to the USB Stick. Please don't save Employee Names into a folder on the USB Drive as the Clocking Terminal will not be able to find them.
On Black & White Clocking Terminals the USB Upload function only uploads the employee ID (101, 102 etc). In order to upload Employee Names, the clock must be connected to your Local Area Network.
|
|
|
At the Clocking Terminal:
You'll need your Admin Card and USB Drive.
| Colour Systems (C200, C250, C400) |
Black & White Systems (C100, C240) |
- Insert the USB Stick into the port on the left hand side of the Clocking Terminal
- Press the M/ key and swipe the Admin Card to access the Admin Menus.
- Use the arrow keys to navigate to USB Stick Icon and press OK.
- Navigate to 'Upload' option and press OK
- Highlight 'User Data' and press OK
- If successful the display will read 'Upload Complete!'. Press OK to confirm and then use the ESC key to return to the main menu.
|
- Use the USB connector cable supplied with your System to connect your USB Stick to the Clocking Terminal.
- Press Menu and swipe the Admin Card to access the Admin Menus.
- Use the arrow keys to navigate to 'PENDRIVEMNG'. Press F4/OK
- Select 'Upload User.'
- Once the data has uploaded you will see the message Copy Data Suc[cessful].
|
|
|
Back to the Top


