Go2Clock - Shift Setup
Creating and Configuring Shifts in the Go2Clock Software
Shift Patterns allow you to set your day-to-day working parameters, including start and finish times, grace and rounding intervals, and break deductions. Having shifts in place also gives you the ability to track late starts and absences.
Before you start, it's helpful to think about the kind of information you'd like to get from the software. If you don't need to flag late starts, for example, consider using a flexible shift pattern to capture working hours for all employees. It's easy to overcomplicate shift setup, and some customers find themselves with several near-identical Shift Patterns where one or two would suffice. It's best to start simple and tweak your Shift Patterns once you have some clocking data in the system.
In this article
- Creating New Shift Patterns
- Copying an Existing Shift Pattern
- Creating Pattern Library's
- Assigning Shift Patterns
Creating New Shift Patterns
- Sign into the software with either the Super Admin account or a Full Dashboard User
-
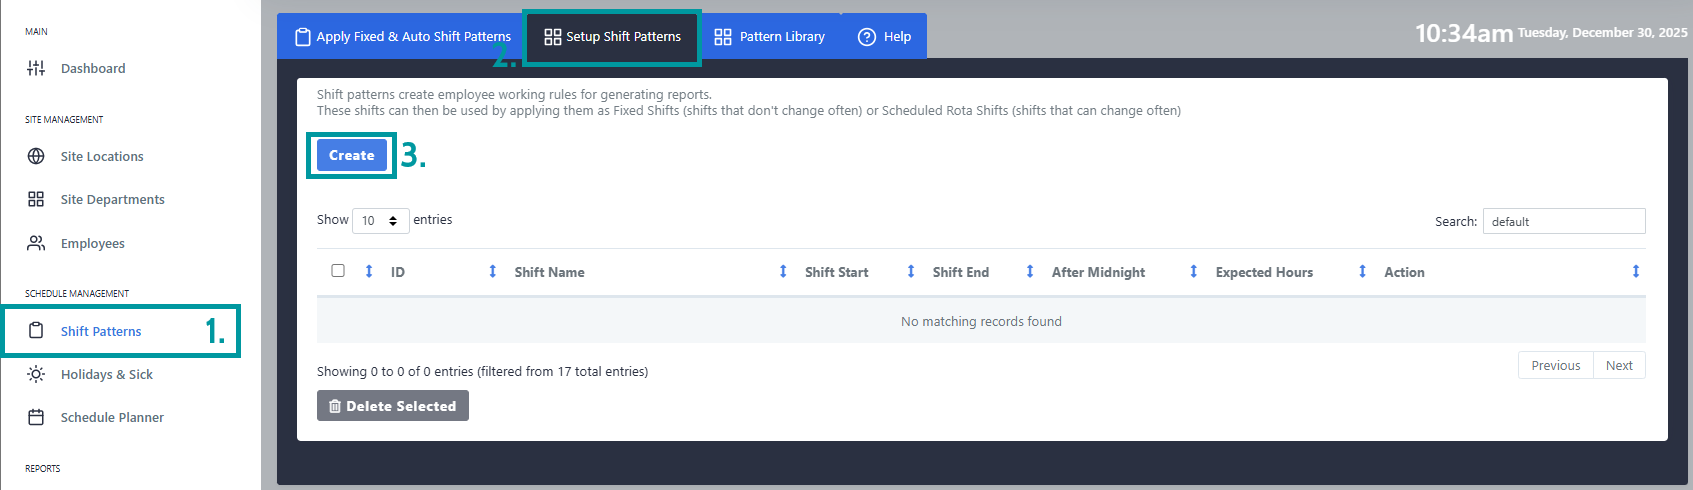
Under Schedule Management select the Shift Patterns option and then navigate to Setup Shift Patterns and click create.
-
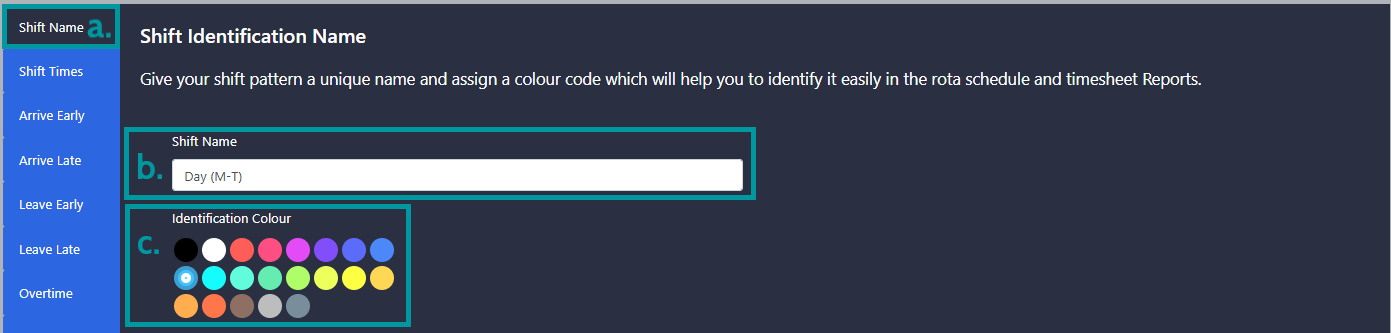
Shift Name - Navigate to the Shift Name tab(a). Give your shift a name(b) and colour(c). This will be used to identify the shift.
-
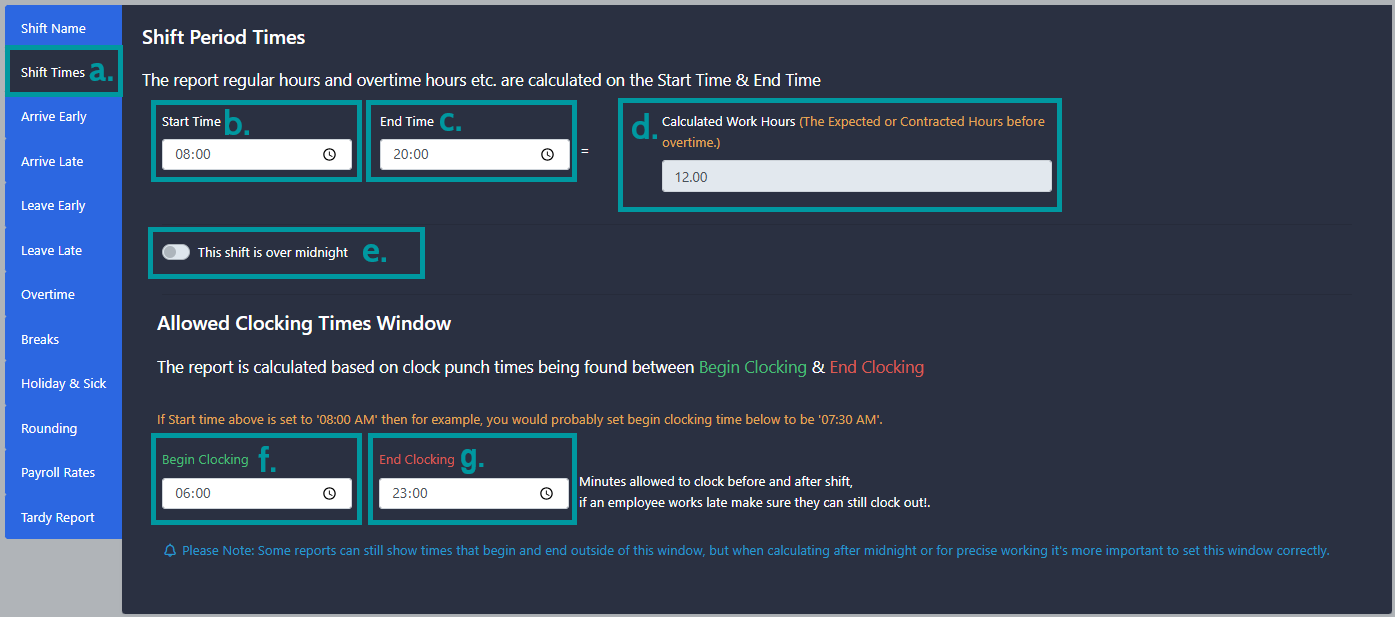
Shift Times - Navigate to the Shift Times tab(a). Set the Start Time(b) and End Time(c).
i. The start time(b) will be used to determine if the user is clocking on time or late.
ii. The end time(c) is used to calculate the work hours. This will be used for daily overtime calculations. Hours worked over the Calculated Work Hours(d) are classed as overtime.
iii. If the shift goes over midnight toggle the This shift is over midnight(e) toggle to allow the shift to use the out clocking from the next day.
iv. Set the Begin Clocking(f) and End Clocking(g). These define when to use these shift rules. Any clockings created outside of this time will still be recorded, however not against the shift.
-
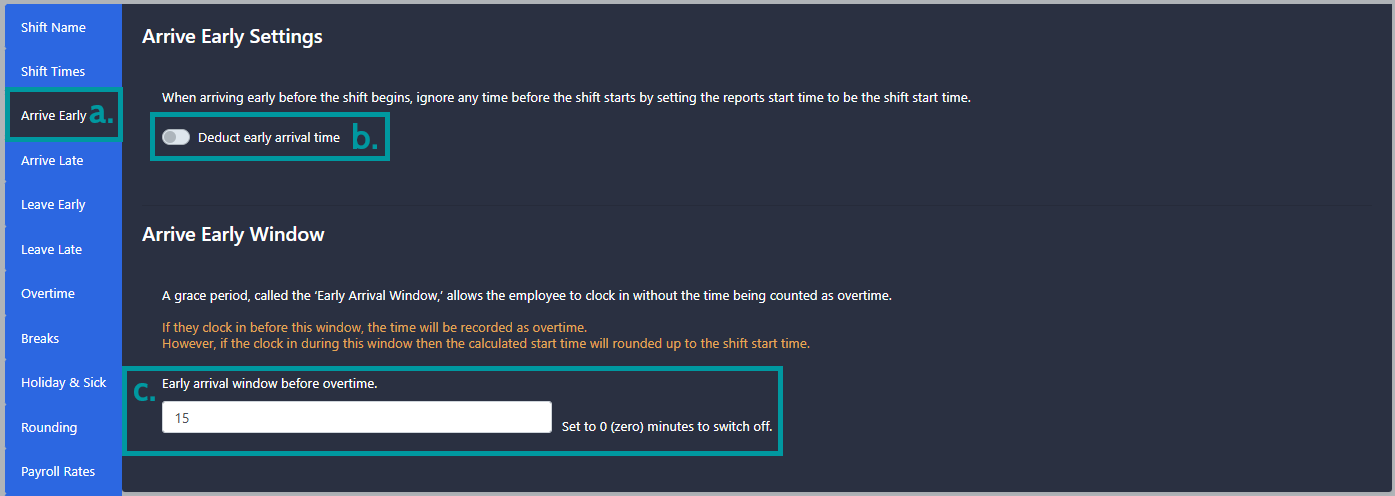
Arrive Early - Navigate to the Arrive Early tab(a).These rules specify what should happen if the employee clocks in before the shift start time. There are two options details below, You should only use one rule per shift.
i. Deduct early arrival time(b) - Any time worked before the shift start time is ignored
ii. Early Arrival Window(c) - Clockings before this window are recorded, clockings during the window are ignored.
-
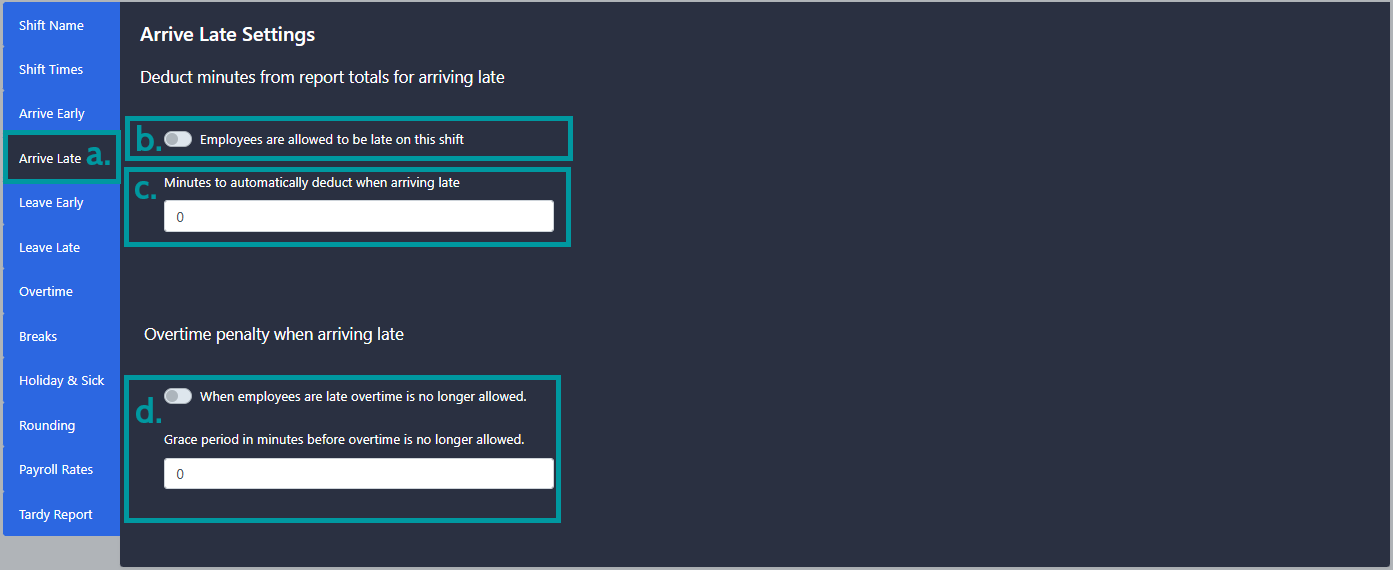
Arrive Late - Navigate to the Arrive Late tab(a). These rules specify what should happen if the employee clocks in after the shift start time.
i. Late allowed toggle(b) - If this is enabled when an employee is late to a shift the status will be late allowed instead of late.
ii. Minutes to deduct when arriving late(c) - If an employee is late to the shift an additional number of minutes will be deducted from them in addition to the time they lost for being late. In most cases this should be set to 0 and grace and rounding would be used instead.
iii. Overtime Penalty -
-
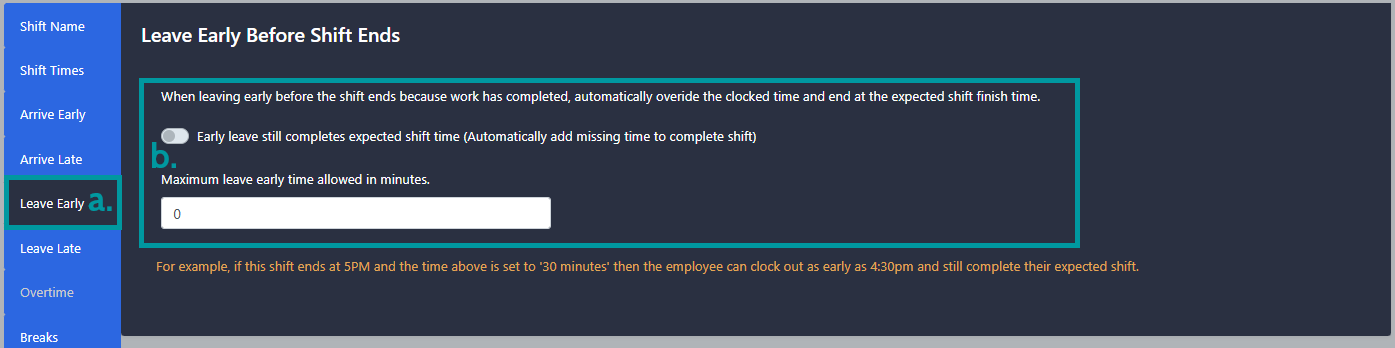
Leave Early - Navigate to the Leave Early tab(a). These rules specify what should happen if the employee clocks out before the shift end time.
i. Early leave toggle(b) - This option allows employees to be paid up until the shift end time if they clock out early.
-
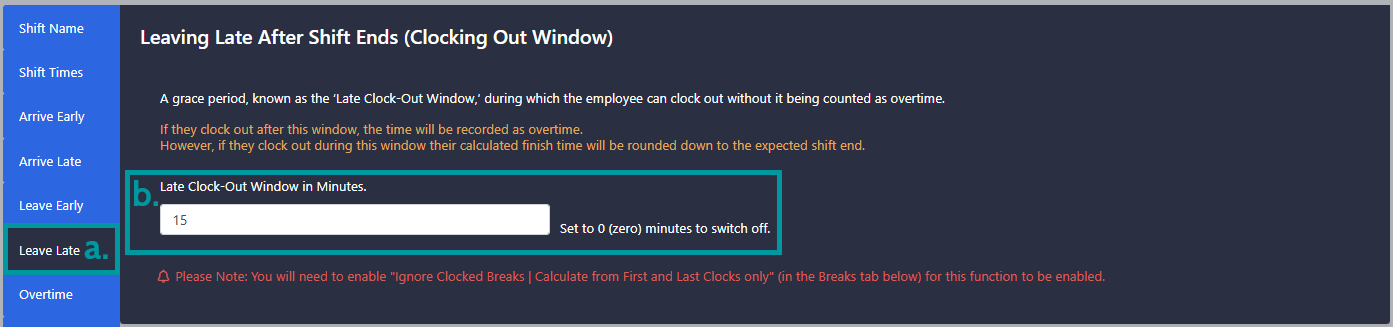
Leave Late - Navigate to the Leave Late tab(a). These rules specify what should happen if the employee clocks out after the shift end time.
i. Late Clock Out Window - Once the shift end time has elapsed, if an employee is still clocked in, a window can be put in place to allow for grace for employees to be able to clock out before they start to reach overtime. If there is not setup to be a grace period and the shift is to roll onto overtime immediately after, set the value to 0.
-
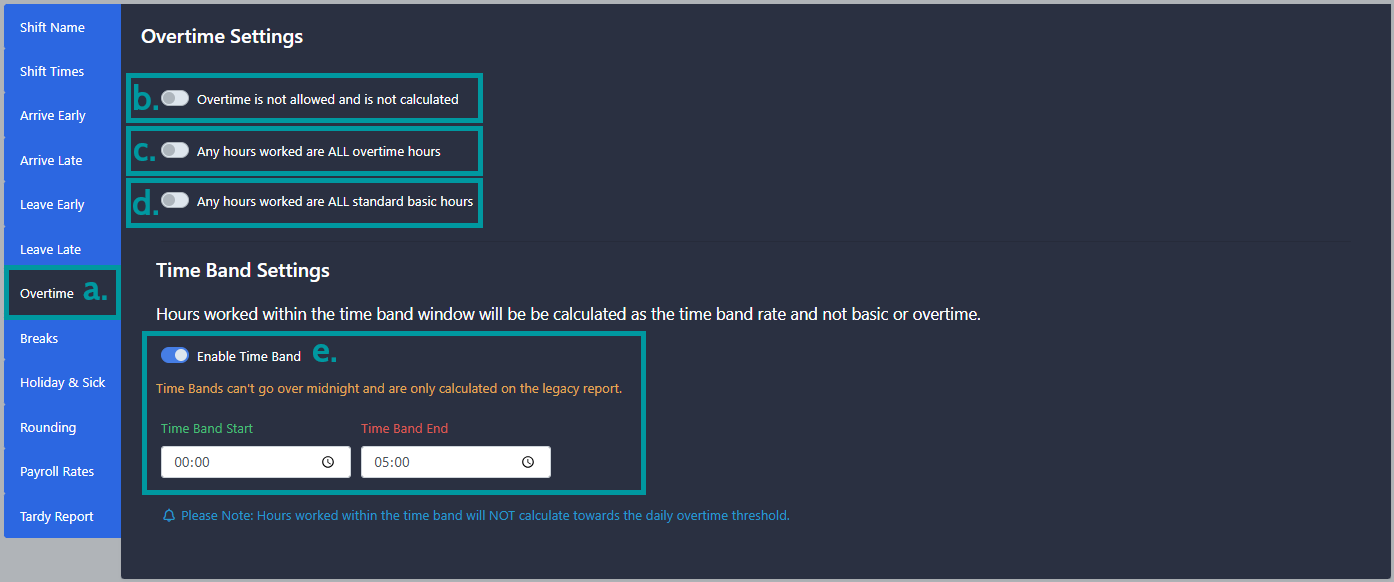
Overtime - Navigate to the Overtime tab(a). These rules allow you to specify how the shift calculates overtime.
i. Overtime is not allowed(b) - If enabled overtime isn't calculated and any hours worked over the contracted hours won't be displayed.
ii. All hours are overtime(c) - If enabled the entire shift will be calculated at the overtime rate regardless of the number of hours worked.
iii. All hours are standard(d) - If enabled the entire shift will be calculated at the standard rate regardless of the number of hours worked.
iv. Override weekly overtime rule() - If enabled this shifts isn't used for weekly overtime calculations within the legacy timesheet.
v. Time Band(e) - If enabled any hours worked between the time band start and end times are not attributed to basic or overtime and are instead calculated at their own rate of pay. Hours worked within the time band also do not contribute towards the daily overtime threshold.
-
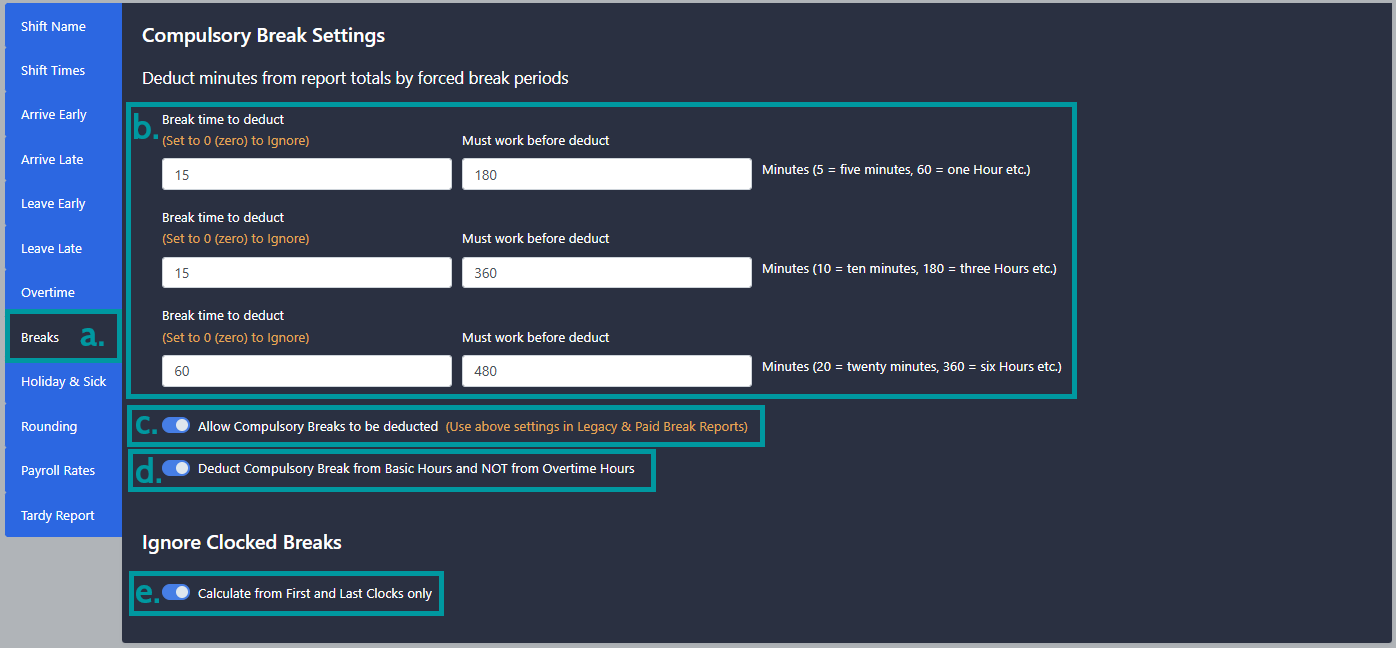
Breaks - Navigate to the Breaks tab(a). These rules allow you to specify break deductions and ignoring additional clockings.
i. Break time to deduct(b) - Here you can specify how how many minutes to deduct from the shift and how long needs to be worked before the break deduction takes place. You can have up to 3 break deduction per shift. To enable this feature ensure toggle(c) is turned on.
ii. Deduct from basic(d) - Enabling this ensures the break is deducted from the basic hours even if the employee has worked overtime.
iii. Ignore clocked breaks(e) - Enabling this will mean that only the first and last clocking of the day are used for hours calculations. Any clockings made in between will be ignored. This needs to be turned on for some snap to shift features to work.
- Holiday & Sick - This tab is used for setting up half days holiday and sickness and can be ignored. We will cover how to use this feature in our setting up Holiday and Sickness Guide.
-
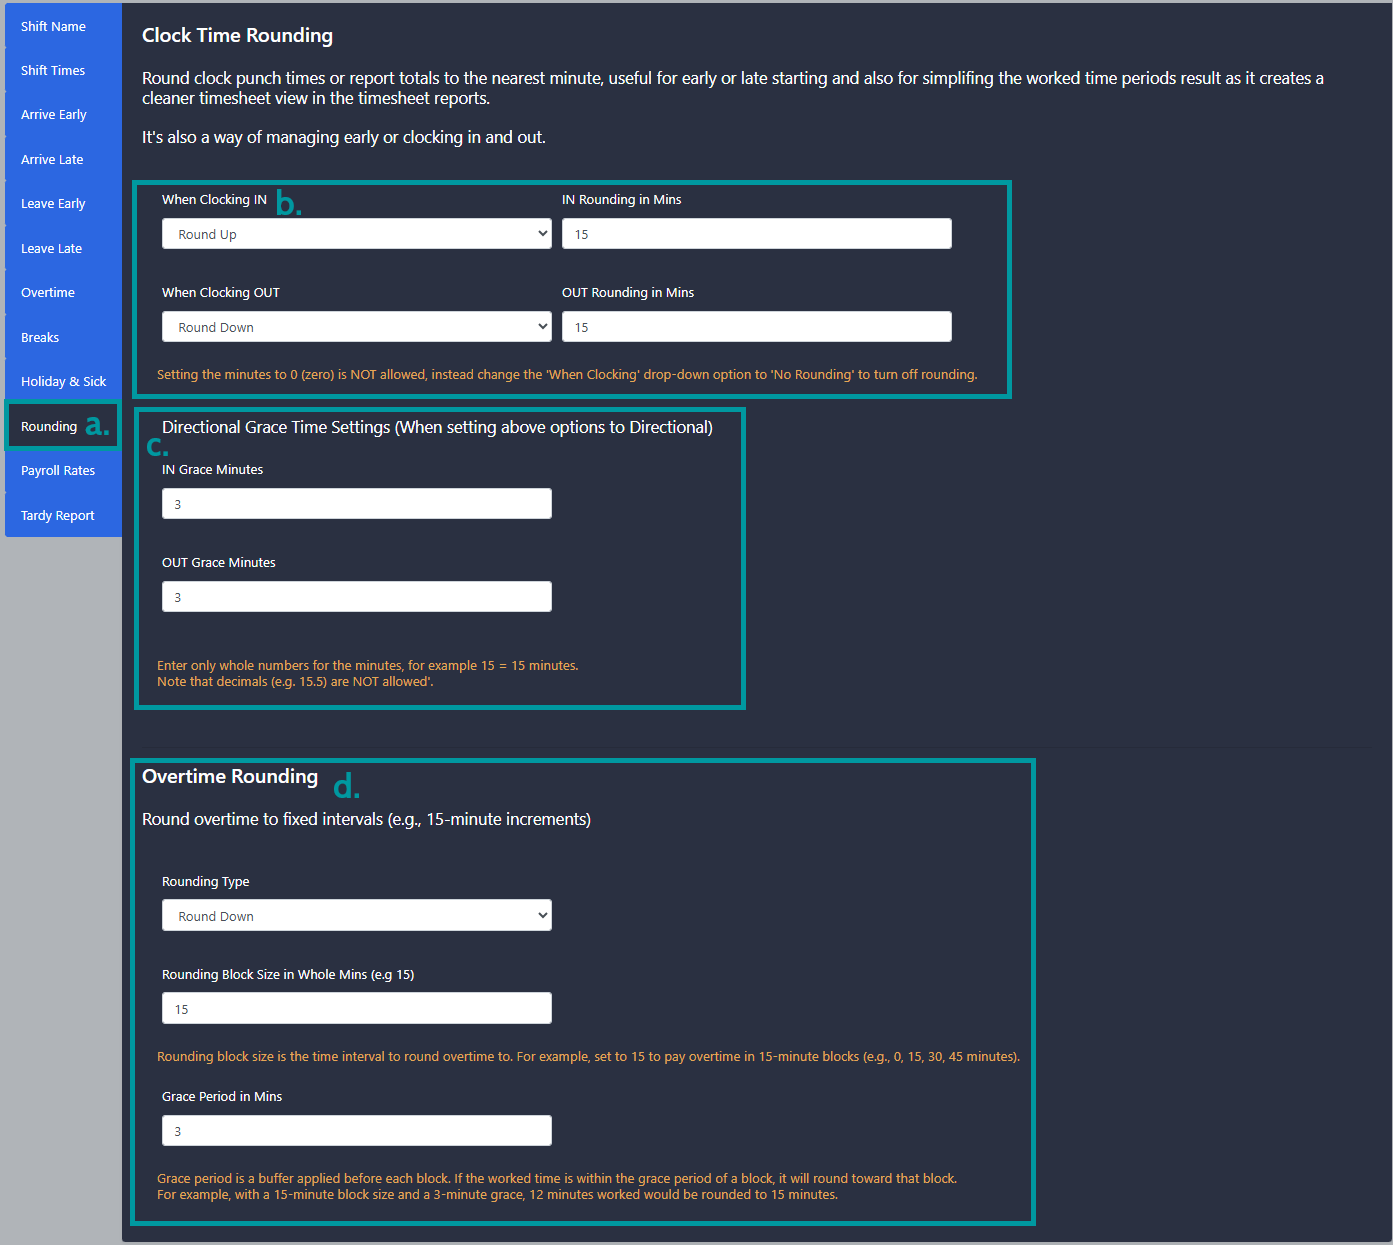
Rounding - Navigate to the Rounding tab(a). Here you can set up rounding for the punch times and roundings for the overtime calculations.
i. Roundings(b) - Here you can choose to set a rounding direction and block size for the punches on the timesheet. Using this feature will mean that you see the rounded punches and not the actual punch time.
ii. Grace(c) - This option allows you to add a grace to the rounding that will round in the opposite direction.
iii. Overtime Rounding(d) - Here you can set up rounding for overtime calculation. This feature doesn't change the displayed punch times and only applies the rounding to the overtime calculated.
-
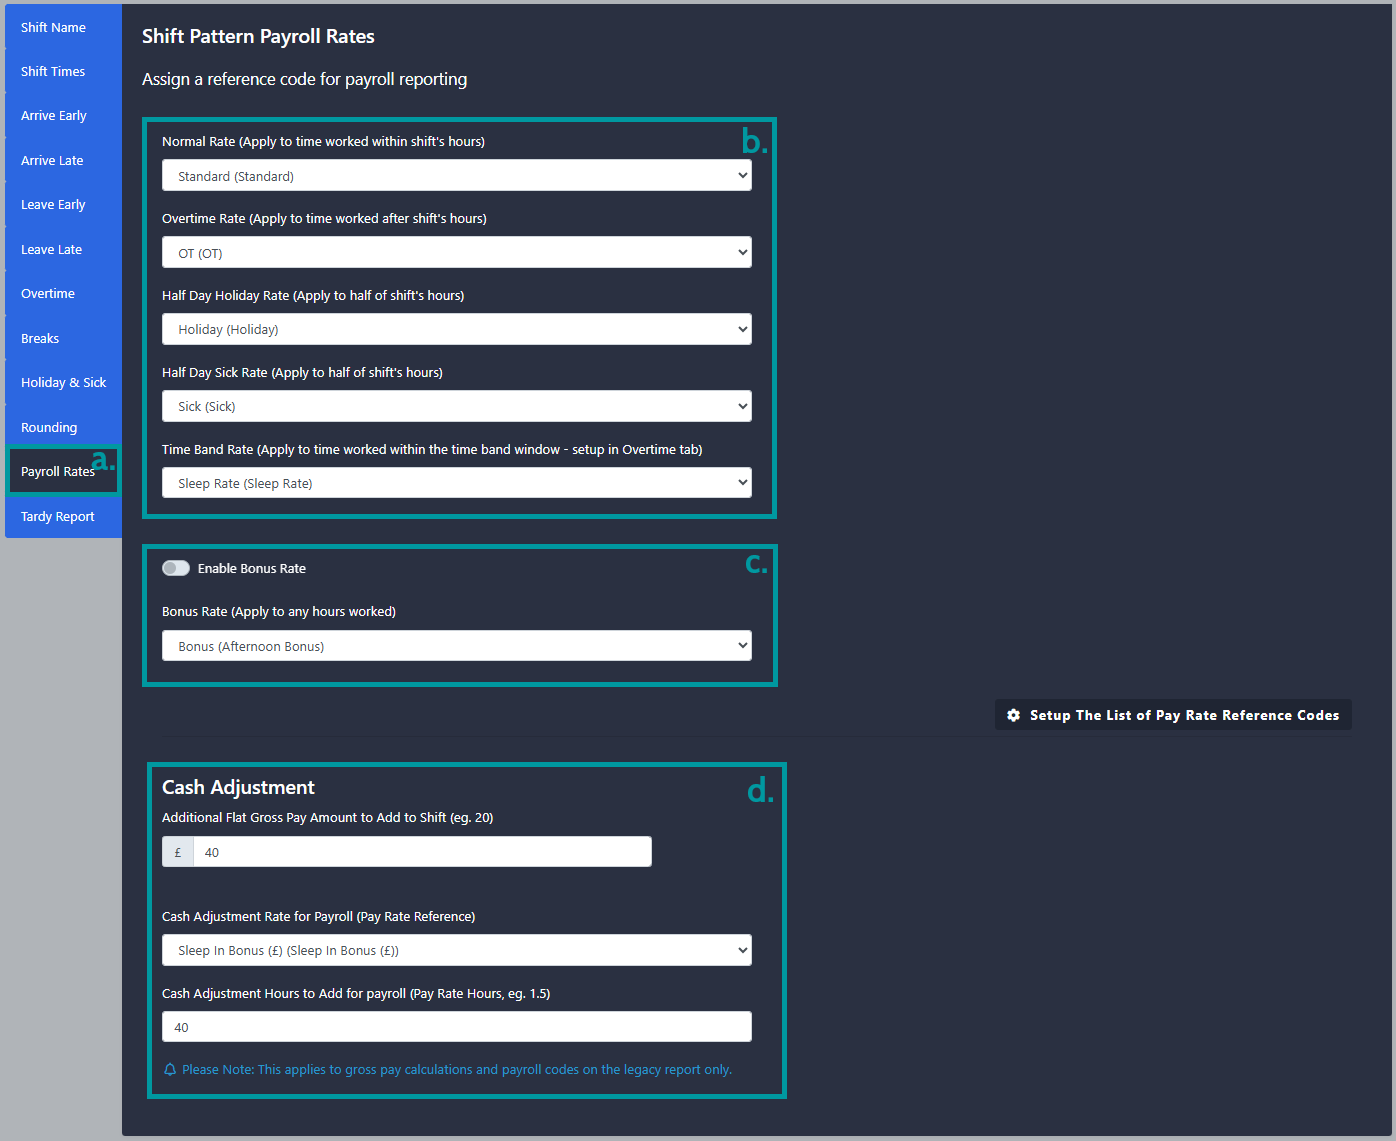
Payroll Rates - Navigate to the Payroll rates tab(a). Here you can specify pay codes to use if you are using shift pattern payroll reports such as the sage export and can setup cash adjustments.
i. Assigning pay reference codes to rates(b) - Each pay rate within the shift can be assigned its's own pay reference. This can be to further split a weeks hours. e.g. Saturdays have a different rate or for exporting to payroll programs such as sage.
ii. Bonus Rate(c) - The bonus rate is a separate rate of pay that can be enabled for specific shifts. Hours worked on this rate will be assigned worked time on both the standard hours in reports, and the bonus rate as well. This can be assigned a reference code if your payroll app is set up with a bonus rate in mind.
iii. Cash Adjustments(d) - This allows for a flat £ amount to be added to the shift, this is then displayed within the Gross pay calculation. An amount can then also be added to a pay code.
-
Tardy Report - Navigate to the Tardy Report tab(a). Here you can enable a Tardy Report to automatically be emailed each day for the shift. Please see example email here.
To use this set the time(b) you want the report to be emailed each day and specify the email address(c) you want the report to be sent to. You will also need to turn on the enable toggle(d).

- Once all of the above setting have been configured click create at the bottom of the screen.


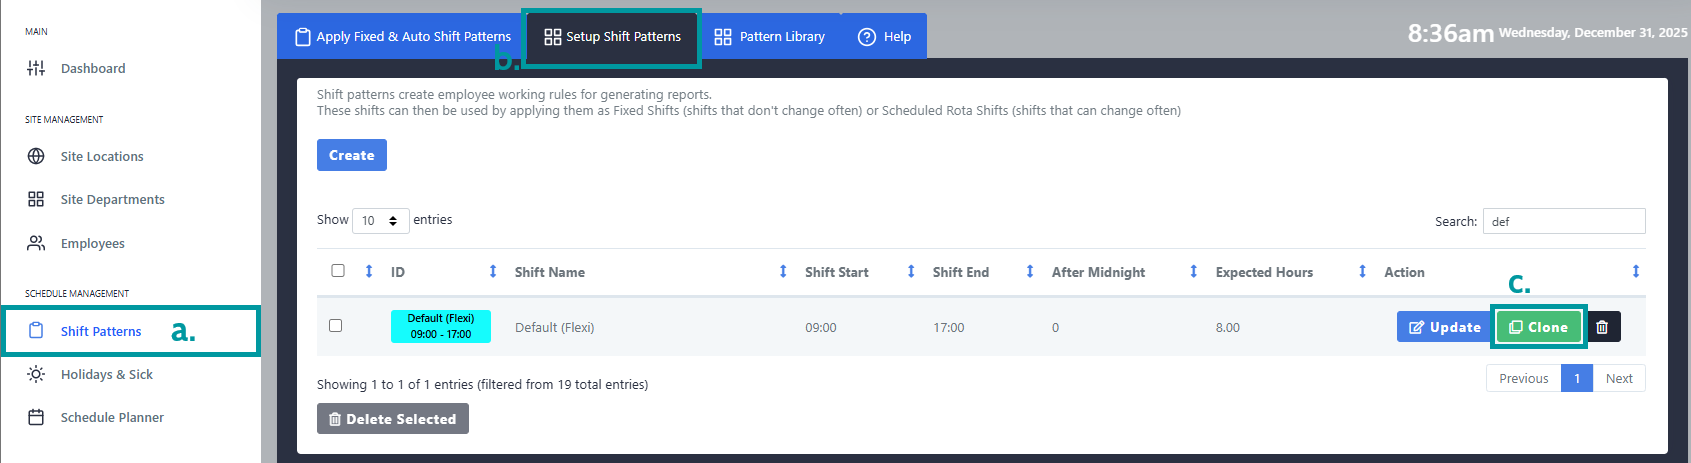
Copying an Existing Shift pattern
If you require a new shift that is similar to an existing you can clone the existing shift and then make the required changes to the copy.
-
Under Schedule Management select the Shift Patterns(a) option and then navigate to Setup Shift Patterns(b). Once here find the shift you want to copy and click Clone(c).
This will then bring you back to the shift creation screen, where the new shift can be titled and any adjustments can be made.

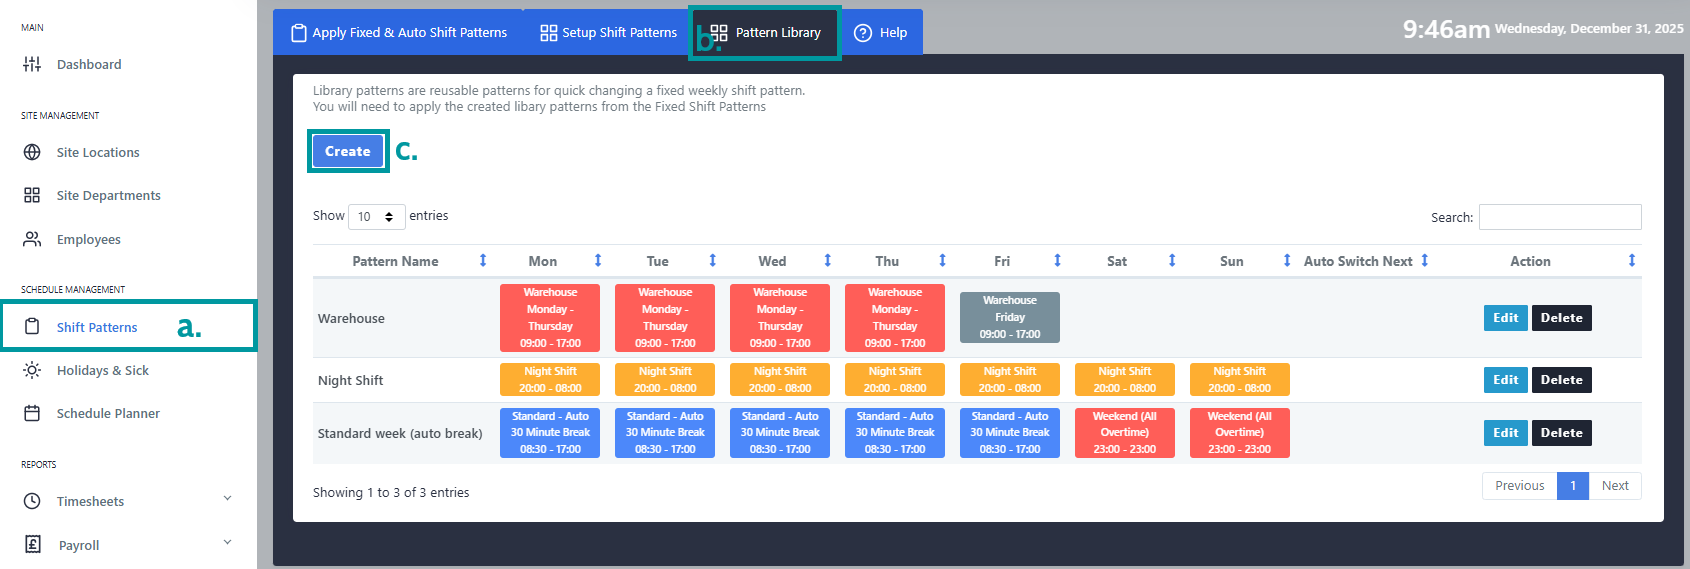
Creating Pattern Library's
Pattern Library's are week long periods. Each day can have a different shift and they can be set up to rotate from one pattern library to the next.
-
Under Schedule Management select the Shift Patterns(a) option and then navigate to Pattern Library(b) and click Create(c).
-
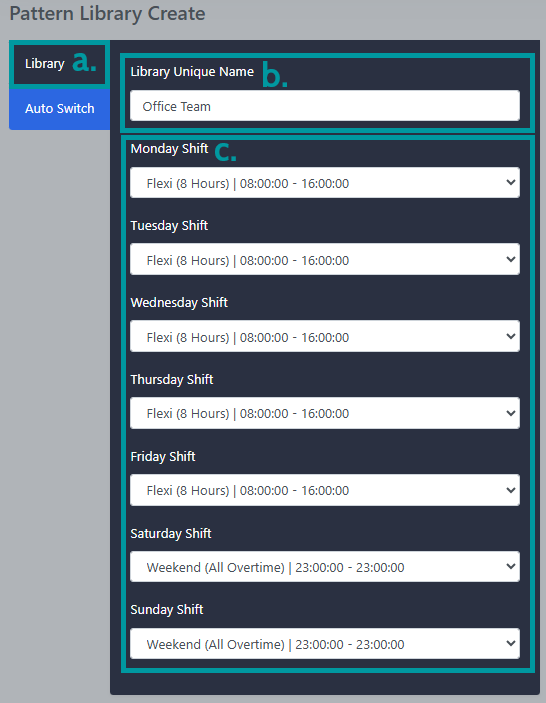
Navigate to the Library tab(a). Enter a library name(b), this will be used to identify the library. You can the set the shift pattern to use for each day of the week(c).
-
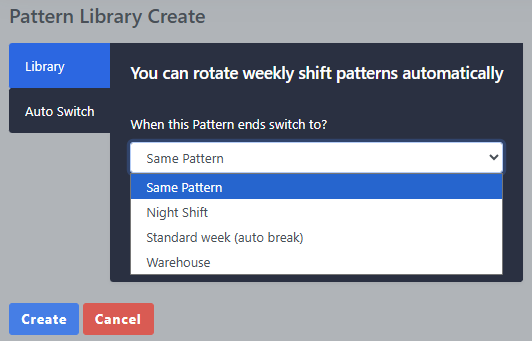
If the week is to roll onto a different library pattern this can be done under Auto Switch. Select the correct shift library you are after and once the current is complete, this will then roll onto the select library.
- Once done Click Create.


Assigning Shift Patterns
How do I use or assign shift patterns?
Shift Patterns are reusable and they can be assigned to employees in three different ways.
-
Fixed - The shift is always the same, such as a 9am to 5pm job.
To use... Create your daily shifts, Create a seven day pattern library to hold the shifts, apply the fixed shift to an employee.
-
Auto Switch - The shift rotates on weekly basis, for example week one an employee works mornings, week two they work evenings.
To use Auto Switch... Create your daily shifts, Create seven day Pattern libraries to hold the shifts and set the pattern libraries to use auto switch, apply the auto switch shift library for current week to an employee.
-
Schedule - The shift can vary from day to day. This option works well when your employee can work different shift times each day or when you run reports longer than 7 days in length and their shifts change during that time.
To use a schedule... Create your daily shifts, assign the shifts using the Rota. The rota can also be used to override any of the shift methods already in place, so its good for occasional shift changes.
Timesheet reports that use shift patterns will automatically implement any of the methods you have set in place. Note that Rota scheduled will overide any other type of shift pattern in place. And the Auto Switch will override any fixed shift that has been setup.
Do I have to use shift patterns?
It depends on how your employees work and what information you want to be displayed in the reports.
For example, if your employees only work in one 24-hour period (one day) and you just want to see the raw time they have worked then you don't need to use shift patterns. However, if your employees work over midnight (two days) then those employees will need to use a shift pattern so the report knows to search for clock data over two days.
An employee normally works the same shift, but on occasions they may change shifts?
Probably set the employee to use fixed shifts, then on the dates that the employee may change shifts use the schedule Rota to set up a shift on that day, it will automatically override the set fixed shift.
An employee is not working their shift, they may be off sick or on holiday?
Use the Schedule Rota to override the expected fixed shift. In the Schedule Rota set the type of shift, sick or leave on the required day.
Auto Switch - weekly rotation of shifts
If your company has rotating weekly shift patterns then you can use the Auto Switch feature to change the shift pattern automatically on a weekly basis.
In order to use the auto switch feature you need to do the following steps...
- Create Shift Patterns.
-
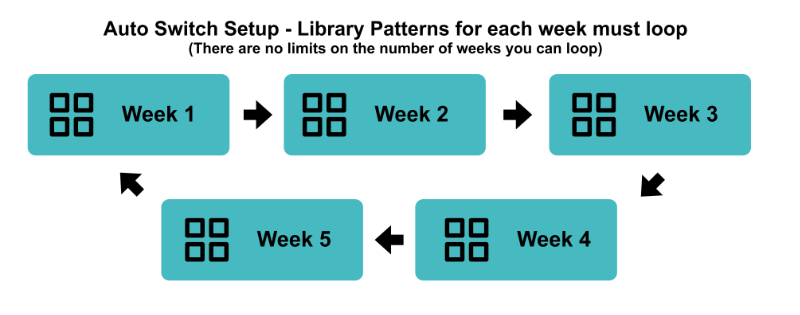
Create Pattern Libraries for each week of the rotation and set their auto switches to point to the next pattern library that will be used for the following week.
You can create as many pattern libraries and auto switches as required, but you should create a loop so the last pattern library switches to the first pattern library, so the loop continues.
- Apply the auto switch to selected users.
Note: the Auto Switch will create a loop for the next 52 weeks or a year, if you have an odd number of shifts you may need to reset the auto switch to the correct week in a years time.