Moving ClockRite Between PCs
Moving ClockRite between PCs
This page explains how to move your existing ClockRite installation from one PC to another. Please follow all steps carefully to avoid errors or loss of data.
In this Article
- Locating Your ClockRite Database
- Uninstalling ClockRite on the old PC
- Installing ClockRite on the new PC
- Downloading the Installer
- Installing the Software
- Validating the Software
- Updating the Software
- Downloading the Update
- Installing the Update
- Finalising the new Installation
Locating Your ClockRite Database
ClockRite stores all data in two database files: DBClockRite.mdb and ClockRite.mdb. In order to successfully move your ClockRite Software to a new PC, you will need to locate both of these files and make copies to be transported to the new PC.
Common locations for these database files include:
- C:\ClockRite\Database - If the ClockRite database was installed directly to your PC's HardDrive
- E:\ClockRite\Database - If the ClockRite database was installed on a Server or External HardDrive
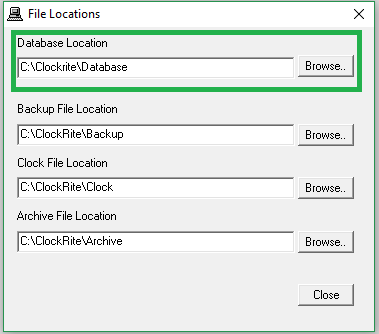
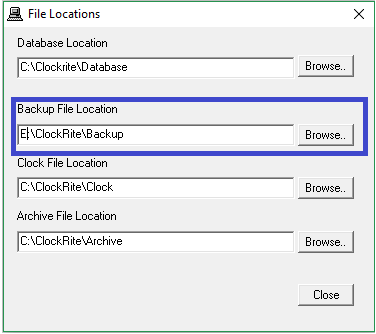
The current location of your ClockRite databases can be checked under File >>> File Locations in your ClockRite Software.
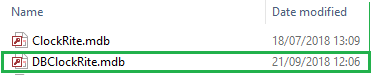
Once you have located the database files, ensure that ClockRite is closed completely, then check the "Date modified" of the DBClockRite.mdb file. A recent "Date Modified" value suggests that the database file is in use and up to date, while an outdated "Date Modified" value may indicate an old, unused, or incorrect database.
Once you're sure you have the correct DBClockRite.mdb and ClockRite.mdb files, copy them onto a USB Drive or zip and send them as an attachment to an Email account that you can access on the new PC.

Uninstalling ClockRite on the old PC
ClockRite can now be safely uninstalled from the old PC. We recommend uninstalling ClockRite on the old PC in order to prevent accidental re-use and resulting duplication of the database.
Installing ClockRite on the new PC
Downloading the Installer
Your Software Installer has been sent to you as a link via email. Click on the link to open the download window and enter '1234' as the password when prompted. Click on the View/Download option to begin the download.

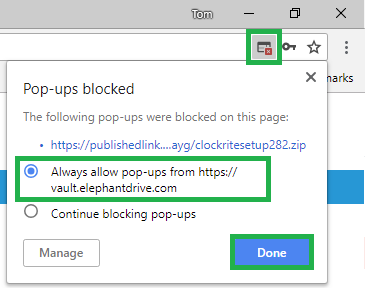
If you're using Google Chrome, you may need to enable popups on the download page in order to download the installation file. To do this, click on the 'popup blocked' icon in the far right of your browser bar and select the 'Always allow' option, then click Done.
Installing the Software
1
Navigate to your downloads folder. (If you specified a different folder when downloading the Installation file, you'll need to go there instead).
2
Locate the Clockritesetup282.zip file (282 refers to the version number, which may differ slightly). The setup file is contained within this .zip file, and must be extracted. Right click on the Clockritesetup282.zip file, and select Extract All...
 3
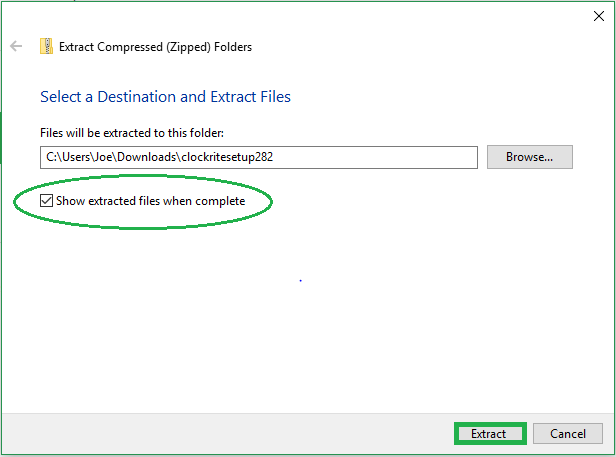
You'll see the following screen. Check the Show extracted files when complete box, and click Extract when you're ready to extract the files.
3
You'll see the following screen. Check the Show extracted files when complete box, and click Extract when you're ready to extract the files.
4
A new folder called 'clockritesetup282' will be created. This folder contains the extracted setup file: setup.exe. Don't click on it yet; you'll need to add the database files copied from the old PC to this folder before the setup.exe file is run.  5
Navigate to the USB Drive or Email containing the ClockRite database files copied from your old PC and move them into the 'clockritesetup282' folder. If you sent the files by email you may need to unzip them. Ensure the two database files occupy the same folder as the setup.exe file, which should then look like this:
5
Navigate to the USB Drive or Email containing the ClockRite database files copied from your old PC and move them into the 'clockritesetup282' folder. If you sent the files by email you may need to unzip them. Ensure the two database files occupy the same folder as the setup.exe file, which should then look like this:
 6
If so, right click on the setup.exe file and select Run as Administrator.
6
If so, right click on the setup.exe file and select Run as Administrator.
 7
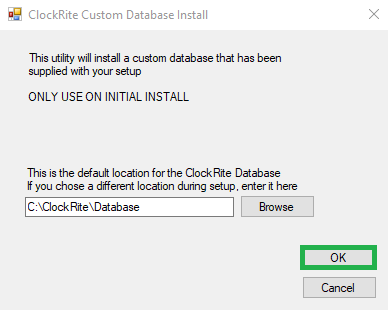
ClockRite will begin installing on your PC. Answer YES to any Windows notifications that appear and follow the onscreen prompts to progress the installation. As a final step, the installer will give you the option to choose a location for your Database. Click OK to select the default C: Drive of the new PC, or use the Browse button to navigate to your location of choice if you would rather install the database files somewhere else.
7
ClockRite will begin installing on your PC. Answer YES to any Windows notifications that appear and follow the onscreen prompts to progress the installation. As a final step, the installer will give you the option to choose a location for your Database. Click OK to select the default C: Drive of the new PC, or use the Browse button to navigate to your location of choice if you would rather install the database files somewhere else.
 8
Launch the Software using the desktop icon.
8
Launch the Software using the desktop icon.

We strongly recommend adding the C:\ClockRite folder to your Anti-Virus exclusions list in order to prevent possible conflicts. For information on how to do this please contact your IT provider or consult the user instructions of your Anti-Virus program.
Validating the Software
1
On opening the newly installed ClockRite Software you will see the following validation request. Please make a note of the Licence and Registration numbers and go to the registration page.
 2
The registration page will ask you to login with a Username and Password. The Username is the email address provided when the System was first ordered. The Password was sent to this email address with the subject 'ClockRite Licence Login Details. Enter these details and click Login. If you can't find these details, contact us for a validation code.
2
The registration page will ask you to login with a Username and Password. The Username is the email address provided when the System was first ordered. The Password was sent to this email address with the subject 'ClockRite Licence Login Details. Enter these details and click Login. If you can't find these details, contact us for a validation code.
 3
Once you're logged in you can enter the Licence and Registration numbers supplied by the ClockRite Software in step 1. Press Calculate.
3
Once you're logged in you can enter the Licence and Registration numbers supplied by the ClockRite Software in step 1. Press Calculate.
 4
The system will then display a validation code. (Yours will be different to the one shown here). Make a note of the number, and head back to the ClockRite Software.
4
The system will then display a validation code. (Yours will be different to the one shown here). Make a note of the number, and head back to the ClockRite Software.
 5
Enter the validation code in the ClockRite Software and press OK to launch the program.
You may now need to update the new installation. Please refer back to points 3 & 4 in our email for an explanation of which (if any) installations need to be updated, and a link to the update file.
5
Enter the validation code in the ClockRite Software and press OK to launch the program.
You may now need to update the new installation. Please refer back to points 3 & 4 in our email for an explanation of which (if any) installations need to be updated, and a link to the update file.
If no updates are necessary, point 3 of our email will ask you to skip ahead to finalise the new installation
Updating the Software
Please ensure that ClockRite is closed completely before running the update
Downloading the Update
The update has been sent to you as a link via email. Click on the link and a new window will open. You'll be prompted for a password. Enter ' 1234', and click on the View/Download option to begin the download.

If you're using Google Chrome, you may need to enable popups on the download page in order to download the update file. To do this, click on the 'popup blocked' icon in the far right of your browser bar and select the 'Always allow' option, then click Done and retry the download.
If you have multiple copies of ClockRite to update we recommend downloading the update file onto a USB drive so it can be easily ported between PCs. If you choose to do this, you can skip straight to step 2 of the update process.
Installing the Update
Please ensure that ClockRite is closed completely on all other PCs before running the update
1
Navigate to your downloads folder. (If you specified a different folder when downloading the update file, you'll need to go there instead).
2
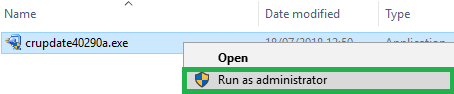
Locate the CRUpdate40290a.exe file (40290 refers to the version number, which may differ slightly). Right click on the file and Run as Administrator
3
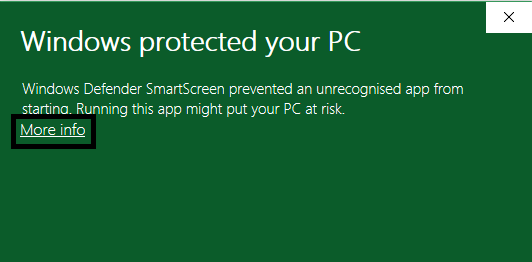
Windows may attempt to block the update. If this happens simply click 'More Info', followed by 'Run Anyway', and answer Yes to any further Windows prompts.
4
The update file will then ask for an installation location. The default of C:\ClockRite is generally accurate unless you have manually installed ClockRite to a different folder, in which case you may need to use the Browse option to navigate to it. Click Unzip, and the update will install itself.

5
The update will then upgrade the ClockRite database automatically.
 6
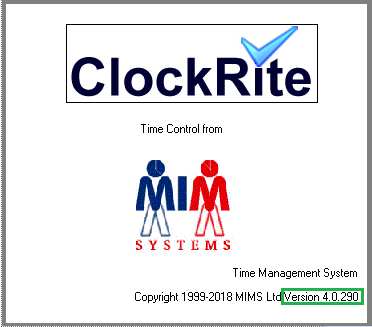
You can now open the ClockRite Software using the desktop icon. Check the version number in the lower right hand corner of the launch window - if the version number matches the string of numbers in the name of the update file (eg crupdate40290a.exe) then your Software has updated successfully. You can also find the version number under Help > About ClockRite.
6
You can now open the ClockRite Software using the desktop icon. Check the version number in the lower right hand corner of the launch window - if the version number matches the string of numbers in the name of the update file (eg crupdate40290a.exe) then your Software has updated successfully. You can also find the version number under Help > About ClockRite.
Finalising the New Installation
1
Open the newly installed ClockRite Program and Go to File >>> File Locations . We strongly recommend setting a secure backup location, preferably on a server or external hard-drive.
2
The Software should now be ready to use. To confirm this, open and refresh the Time and Attendance screen. The data displayed should correspond to the last time the software was used.
Back to the Top


